
Palo Alto Networks provides a wide suite of enterprise-level next-generation firewalls, with a diverse range of security features for the network.
- Configure Syslog
- Configure LEEF for Integration of Palo Alto Logs with DNIF
- Configure TLS
- Validate Logs
To send log events from Palo Alto to DNIF HYPERCLOUD, complete the following steps:
- Configure a Syslog server profile
- Configure syslog forwarding for Traffic, Threat, and WildFire Submission logs
- Configure syslog forwarding for System, Config, HIP Match, and Correlation logs
- (Optional) Configure the header format of syslog messages
- Create a certificate to secure syslog communication over TLSv1.2
- Commit your changes and review the logs on the syslog server
- (Optional) Configure the firewall to terminate the connection to the syslog server upon FQDN refresh
Step I: Configure a Syslog server profile.
- Select Device Server Profiles Syslog..
- Click Add and enter a Name for the profile.
- If the firewall has more than one virtual system (vsys), select the Location (vsys or
Shared ) where this profile is available. - For each syslog server, click Add and enter the information that the firewall requires to connect to it:
- Name—Unique name for the server profile.
- Syslog Server—IP address or fully qualified domain name (FQDN) of the syslog server.
If you configure an FQDN and use UDP transport, if the firewall cannot resolve the FQDN, the firewall uses the existing IP address resolution for the FQDN as the Syslog Server address.
- Transport—Select TCP,UDP, or SSL (TLS) as the protocol for communicating with the syslog server. For SL , the firewall supports only TLSv1.2.
- Port —The port number on which to send syslog messages (default is UDP on port 514); you must use the same port number on the firewall and the syslog server.
- Format—Select the syslog message format to use: BSD (the default) or IETF. Traditionally, BSD format is over UDP and IETF format is over TCP or SSL/TLS.
- Facility—Select a syslog standard value (default is LOG_USER) to calculate the priority (PRI) field in your syslog server implementation. Select the value that maps to how you use the PRI field to manage your syslog messages.
- (Optional) To customize the format of the syslog messages that the firewall sends, select the Custom Log Format tab. For details on how to create custom formats for the various log types, refer to the Common Event Format Configuration Guide.
- Click OK to save the server profile.
Step II - Configure syslog forwarding for Traffic, Threat, and WildFire Submission logs.
- Configure the firewall to forward logs. For more information, see Step Create a Log Forwarding profile.
- Select Objects Log Forwarding, click Add, and enter a Name to identify the profile.
- For each log type and each severity level or WildFire verdict, select the Syslog server profile and click OK.
- Assign the log forwarding profile to a security policy to trigger log generation and forwarding. For more information, See Step Assign the Log Forwarding profile to policy rules and network zones.
- Select Policies Security and select a policy rule.
- Select the Actions tab and select the Log Forwarding profile you created.
- For Traffic logs, select one or both of the Log at Session Start and Log At Session End
check boxes, and click OK - For detailed information about configuring a log forwarding profile and assigning the profile to a policy rule, see Configure Log Forwarding
Step III - Configure syslog forwarding for System, Config, HIP Match, and Correlation logs.
- Select Device > Log Settings
- For System and Correlation logs, click each Severity level, select the
Syslog server profile, and click OK - For Config, HIP Match, and Correlation logs, edit the section, select the
Syslog server profile, and click OK
Step IV - (Optional) Configure the header format of syslog messages.
The log data includes the unique identifier of the firewall that generated the log. Choosing the header format provides more flexibility in filtering and reporting on the log data for some Security Information and Event Management (SIEM) servers.
This is a global setting and applies to all Syslog server profiles configured on the firewall.
- Select Device Setup Management and edit the Logging and Reporting Settings.
- Select the Log Export and Reporting tab and select the Syslog HOSTNAME Format:
- FQDN (default)—Concatenates the hostname and domain name defined on the sending firewall.
- hostname—Uses the hostname defined on the sending firewall.
- ipv4-address—Uses the IPv4 address of the firewall interface used to send logs. By default, this is the MGT interface.
- ipv6-address—Uses the IPv6 address of the firewall interface used to send logs. By default, this is the MGT interface.
- none-Leaves the hostname field unconfigured on the firewall. There is no identifier for the firewall that sent the logs.
- Click OK to save your changes.
Step V - Create a certificate to secure syslog communication over TLSv1.2.
Required only if the syslog server uses client authentication. The syslog server uses the certificate to verify that the firewall is authorized to communicate with the syslog server.
Ensure the following conditions are met:
- The private key must be available on the sending firewall; the keys can’t reside on a Hardware Security Module (HSM).
- The subject and the issuer for the certificate must not be identical.
- The syslog server and the sending firewall must have certificates that the same trusted certificate authority (CA) signed. Alternatively, you can generate a self-signed certificate on the firewall, export the certificate from the firewall, and import it in to the syslog server.
- The connection to a Syslog server over TLS is validated using the Online Certificate Status Protocol (OCSP) or using Certificate Revocation Lists (CRL) so long as each certificate in the trust chain specifies one or both of these extensions. However, you cannot bypass OCSP or CRL failures so you must ensure that the certificate chain is valid and that you can verify each certificate using OCSP or CRL.
- Select Device > Certificate Management > Certificates > Device Certificates
and click Generate. - Enter a Name for the certificate.
- In the Common Name field, enter the IP address of the firewall sending logs to the syslog server.
- In Signed by, select the trusted CA or the self-signed CA that the syslog server and the sending firewall both trust. The certificate can’t be a Certificate Authority nor an External Authority (certificate signing request [CSR]).
- Click Generate. The firewall generates the certificate and key pair.
- Click the certificate Name to edit it, select the Certificate for Secure Syslog check box, and click OK
Step VI - Commit your changes and review the logs on the syslog server
- Click Commit
- To review the logs, refer to the documentation of your syslog management software. You can also review the Syslog Field Descriptions.
Step VII - (Optional) Configure the firewall to terminate the connection to the syslog server upon FQDN refresh.
When you configure a syslog server profile using a FQDN, the firewall maintains its connection to the syslog server by default in the event of an FQDN name change.
For example, you have replaced an existing syslog server with a new syslog server that uses a different FQDN name. If you want the firewall to connect to the new syslog server using a new FQDN name, you can configure the firewall to automatically terminate its connection to the old syslog server and establish a connection to the new syslog server using the new FQDN name.
- Log in to the firewall CLI.
- Configure the firewall to terminate the connection to the syslog server upon FQDN refresh
To forward Palo Alto logs to DNIF, follow the below mentioned configuration steps.
- Log in to Palo Alto Networks.
- On the Device tab, click Server Profiles > Syslog, and then click Add.
- Create a Syslog destination by following these steps:
* In the Syslog Server Profile dialog box, click Add. - In the Syslog Server Profile dialog box, click Add.
- Specify the name, server IP address, port, and facility of the system that you want to use as a Syslog server.
- If you are using Syslog, set the Custom Format column to Default for all log types.
- Configure LEEF events by following these steps:
Due to formatting issues, copy the text into a text editor, remove any carriage return or line feed characters, and then paste it into the appropriate field.
- Click the Custom Log Format tab in the Syslog Server Profile dialogue.
- Click Config, copy one of the following texts applicable to the version you are using, and paste it in the Config Log Format field for the Config log type. If your version is not listed, omit this step.
Product version: PAN-OS 3.0 - 6.1
Log Event Extended Format :
LEEF:2.0|Palo Alto Networks|PAN-OS Syslog Integration|4.0|$result|x7C|cat=$type|usrName=$admin|src=$host|devTime=$cef-formatted-receive_time|client=$client|sequence=$seqno|serial=$serial|msg=$cmd
Product version: PAN-OS 7.1 - 9.1
Log Event Extended Format :
LEEF:2.0|Palo Alto Networks|PAN-OS Syslog Integration|$sender_sw_version|$result|x7C|ReceiveTime=$receive_time|SerialNumber=$serial|cat=$type|devTime=$cef-formatted-receive_time|src=$host|VirtualSystem=$vsys|msg=$cmd|usrName=$admin|client=$client|Result=$result|ConfigurationPath=$path|sequence=$seqno|ActionFlags=$actionflags|BeforeChangeDetail=$before-change-detail|AfterChangeDetail=$after-change-detail|DeviceGroupHierarchyL1=$dg_hier_level_1|DeviceGroupHierarchyL2=$dg_hier_level_2|DeviceGroupHierarchyL3=$dg_hier_level_3|DeviceGroupHierarchyL4=$dg_hier_level_4|vSrcName=$vsys_name|DeviceName=$device_name
- Click System, copy one of the following texts applicable to the version you are using, and paste it in the System Log Format field for the System log type. If your version is not listed, omit this step.
Product version: PAN-OS 3.0 - 6.1
Log Event Extended Format :
LEEF:2.0|Palo Alto Networks|PAN-OS Syslog Integration|4.0|$eventid|x7C|cat=$type|Subtype=$subtype|devTime=$cef-formatted-receive_time|sev=$severity|Severity=$number-of-severity|msg=$opaque|Filename=$object
Product version: PAN-OS 7.1 - 9.1
Log Event Extended Format :
LEEF:2.0|Palo Alto Networks|PAN-OS Syslog Integration|$sender_sw_version|$eventid|x7C|ReceiveTime=$receive_time|SerialNumber=$serial|cat=$type|Subtype=$subtype|devTime=$cef-formatted-receive_time|VirtualSystem=$vsys|Filename=$object|Module=$module|sev=$number-of-severity|Severity=$severity|msg=$opaque|sequence=$seqno|ActionFlags=$actionflags|DeviceGroupHierarchyL1=$dg_hier_level_1|DeviceGroupHierarchyL2=$dg_hier_level_2|DeviceGroupHierarchyL3=$dg_hier_level_3|DeviceGroupHierarchyL4=$dg_hier_level_4|vSrcName=$vsys_name|DeviceName=$device_name
- Click Threat, copy one of the following texts applicable to the version you are using, and paste it in the Threat Log Format field for the Threat log type. If your version is not listed, omit this step.
Product version: PAN-OS 3.0 - 6.1
Log Event Extended Format :
LEEF:2.0|Palo Alto Networks|PAN-OS Syslog Integration|4.0|$threatid|x7C|cat=$type|Subtype=$subtype|src=$src|dst=$dst|srcPort=$sport|dstPort=$dport|proto=$proto|usrName=$srcuser|SerialNumber=$serial|srcPostNAT=$natsrc|dstPostNAT=$natdst|RuleName=$rule|SourceUser=$srcuser|DestinationUser=$dstuser|Application=$app|VirtualSystem=$vsys|SourceZone=$fromDestinationZone=$to|IngressInterface=$inbound_if|EgressInterface=$outbound_if|LogForwardingProfile=$logset|SessionID=$sessionid|RepeatCount=$repeatcnt|srcPostNATPort=$natsport|dstPostNATPort=$natdport|Flags=$flags|URLCategory=$category|sev=$severity|Severity=$number-of-severity|Direction=$direction|ContentType=$contenttype|action=$action|Miscellaneous=$misc
Product version: PAN-OS 7.1
Log Event Extended Format :
LEEF:2.0|Palo Alto Networks|PAN-OS Syslog Integration|$sender_sw_version|$threatid|x7C|ReceiveTime=$receive_time|SerialNumber=$serial|cat=$type|Subtype=$subtype|devTime=$cef-formatted-receive_time|src=$src|dst=$dst|srcPostNAT=$natsrc|dstPostNAT=$natdst|RuleName=$rule|usrName=$srcuser|SourceUser=$srcuser|DestinationUser=$dstuser|Application=$app|VirtualSystem=$vsys|SourceZone=$from|DestinationZone=$to|IngressInterface=$inbound_if|EgressInterface=$outbound_if|LogForwardingProfile=$logset|SessionID=$sessionid|RepeatCount=$repeatcnt|srcPort=$sport|dstPort=$dport|srcPostNATPort=$natsport|dstPostNATPort=$natdport|Flags=$flags|proto=$proto|action=$action|Miscellaneous=$misc|ThreatID=$threatid|URLCategory=$category|sev=$number-of-severity|Severity=$severity|Direction=$direction|sequence=$seqno|ActionFlags=$actionflags|SourceLocation=$srcloc|DestinationLocation=$dstloc|ContentType=$contenttype|PCAP_ID=$pcap_id|FileDigest=$filedigest|Cloud=$cloud|URLIndex=$url_idx|UserAgent=$user_agent|FileType=$filetype|identSrc=$xff|Referer=$referer|Sender=$sender|Subject=$subject|Recipient=$recipient|ReportID=$reportid|DeviceGroupHierarchyL1=$dg_hier_level_1|DeviceGroupHierarchyL2=$dg_hier_level_2|DeviceGroupHierarchyL3=$dg_hier_level_3|DeviceGroupHierarchyL4=$dg_hier_level_4|vSrcName=$vsys_name|DeviceName=$device_name
Product version: PAN-OS 8.0 - 9.1
Log Event Extended Format :
LEEF:2.0|Palo Alto Networks|PAN-OS Syslog Integration|$sender_sw_version|$threatid|x7C|ReceiveTime=$receive_time|SerialNumber=$serial|cat=$type|Subtype=$subtype|devTime=$cef-formatted-receive_time|src=$src|dst=$dst|srcPostNAT=$natsrc|dstPostNAT=$natdst|RuleName=$rule|usrName=$srcuser|SourceUser=$srcuser|DestinationUser=$dstuser|Application=$app|VirtualSystem=$vsys|SourceZone=$from|DestinationZone=$to|IngressInterface=$inbound_if|EgressInterface=$outbound_if|LogForwardingProfile=$logset|SessionID=$sessionid|RepeatCount=$repeatcnt|srcPort=$sport|dstPort=$dport|srcPostNATPort=$natsport|dstPostNATPort=$natdport|Flags=$flags|proto=$proto|action=$action|Miscellaneous=$misc|ThreatID=$threatid|URLCategory=$category|sev=$number-of-severity|Severity=$severity|Direction=$direction|sequence=$seqno|ActionFlags=$actionflags|SourceLocation=$srcloc|DestinationLocation=$dstloc|ContentType=$contenttype|PCAP_ID=$pcap_id|FileDigest=$filedigest|Cloud=$cloud|URLIndex=$url_idx|RequestMethod=$http_method|Subject=$subject|DeviceGroupHierarchyL1=$dg_hier_level_1|DeviceGroupHierarchyL2=$dg_hier_level_2|DeviceGroupHierarchyL3=$dg_hier_level_3|DeviceGroupHierarchyL4=$dg_hier_level_4|vSrcName=$vsys_name|DeviceName=$device_name|SrcUUID=$src_uuid|DstUUID=$dst_uuid|TunnelID=$tunnelid|MonitorTag=$monitortag|ParentSessionID=$parent_session_id|ParentStartTime=$parent_start_time|TunnelType=$tunnel|ThreatCategory=$thr_category|ContentVer=$contentver
- Click Traffic, copy one of the following texts applicable to the version you are using, and paste it in the Traffic Log Format field for the Traffic log type. If your version is not listed, omit this step.
Product version: PAN-OS 3.0 - 6.1
Log Event Extended Format :
LEEF:2.0|Palo Alto Networks|PAN-OS Syslog Integration|4.0|$action|x7C|cat=$type|src=$src|dst=$dst|srcPort=$sport|dstPort=$dport|proto=$proto|usrName=$srcuser| SerialNumber=$serial|Type=$type|Subtype=$subtype|srcPostNAT=$natsrc|dstPostNAT=$natdst|RuleName=$rule|SourceUser=$srcuser|DestinationUser=$dstuser|Application=$app| VirtualSystem=$vsys|SourceZone=$from|DestinationZone=$to|IngressInterface=$inbound_if|EgressInterface=$outbound_if|LogForwardingProfile=$logset|SessionID=$sessionid|RepeatCount=$repeatcnt|srcPostNATPort=$natsport|dstPostNATPort=$natdport|Flags=$flags|totalBytes=$bytes|totalPackets=$packets|ElapsedTime=$elapsed|URLCategory=$category|dstBytes=$bytes_received|srcBytes=$bytes_sent|action=$action
Product version: PAN-OS 7.1
Log Event Extended Format :
LEEF:2.0|Palo Alto Networks|PAN-OS Syslog Integration|$sender_sw_version|$action|x7C|cat=$type|ReceiveTime=$receive_time|SerialNumber=$serial|Type=$type|Subtype=$subtype|devTime=$cef-formatted-receive_time|src=$src|dst=$dst|srcPostNAT=$natsrc|dstPostNAT=$natdst|RuleName=$rule|usrName=$srcuser|SourceUser=$srcuser|DestinationUser=$dstuser|Application=$app|VirtualSystem=$vsys|SourceZone=$from|DestinationZone=$to|IngressInterface=$inbound_if|EgressInterface=$outbound_if|LogForwardingProfile=$logset|SessionID=$sessionid|RepeatCount=$repeatcnt|srcPort=$sport|dstPort=$dport|srcPostNATPort=$natsport|dstPostNATPort=$natdport|Flags=$flags|proto=$proto|action=$action|totalBytes=$bytes|dstBytes=$bytes_received|srcBytes=$bytes_sent|totalPackets=$packets|StartTime=$start|ElapsedTime=$elapsed|URLCategory=$category|sequence=$seqno|ActionFlags=$actionflags|SourceLocation=$srcloc|DestinationLocation=$dstloc|dstPackets=$pkts_received|srcPackets=$pkts_sent|SessionEndReason=$session_end_reason|DeviceGroupHierarchyL1=$dg_hier_level_1|DeviceGroupHierarchyL2=$dg_hier_level_2|DeviceGroupHierarchyL3=$dg_hier_level_3|DeviceGroupHierarchyL4=$dg_hier_level_4|vSrcName=$vsys_name|DeviceName=$device_name|ActionSource=$action_source
Product version: PAN-OS 8.0 - 9.1
Log Event Extended Format :
LEEF:2.0|Palo Alto Networks|PAN-OS Syslog Integration|$sender_sw_version|$action|x7C|cat=$type|ReceiveTime=$receive_time|SerialNumber=$serial|Type=$type|Subtype=$subtype|devTime=$cef-formatted-receive_time|src=$src|dst=$dst|srcPostNAT=$natsrc|dstPostNAT=$natdst|RuleName=$rule|usrName=$srcuser|SourceUser=$srcuser|DestinationUser=$dstuser|Application=$app|VirtualSystem=$vsys|SourceZone=$from|DestinationZone=$to|IngressInterface=$inbound_if|EgressInterface=$outbound_if|LogForwardingProfile=$logset|SessionID=$sessionid|RepeatCount=$repeatcnt|srcPort=$sport|dstPort=$dport|srcPostNATPort=$natsport|dstPostNATPort=$natdport|Flags=$flags|proto=$proto|action=$action|totalBytes=$bytes|dstBytes=$bytes_received|srcBytes=$bytes_sent|totalPackets=$packets|StartTime=$start|ElapsedTime=$elapsed|URLCategory=$category|sequence=$seqno|ActionFlags=$actionflags|SourceLocation=$srcloc|DestinationLocation=$dstloc|dstPackets=$pkts_received|srcPackets=$pkts_sent|SessionEndReason=$session_end_reason|DeviceGroupHierarchyL1=$dg_hier_level_1|DeviceGroupHierarchyL2=$dg_hier_level_2|DeviceGroupHierarchyL3=$dg_hier_level_3|DeviceGroupHierarchyL4=$dg_hier_level_4|vSrcName=$vsys_name|DeviceName=$device_name|ActionSource=$action_source|SrcUUID=$src_uuid|DstUUID=$dst_uuid|TunnelID=$tunnelid|MonitorTag=$monitortag|ParentSessionID=$parent_session_id|ParentStartTime=$parent_start_time|TunnelType=$tunnel
- If you are using versions other than PAN-OS 3.0 - 6.1, click HIP Match, copy one of the following texts applicable to the version you are using, and paste it in the HIP Match Log Format field for the HIP Match log type.
Product version: PAN-OS 7.1
Log Event Extended Format :
LEEF:2.0|Palo Alto Networks|PAN-OS Syslog Integration|$sender_sw_version|$matchname|x7C|ReceiveTime=$receive_time|SerialNumber=$serial|cat=$type|Subtype=$subtype|devTime=$cef-formatted-receive_time|usrName=$srcuser|VirtualSystem=$vsys|identHostName=$machinename|OS=$os|identSrc=$src|HIP=$matchname|RepeatCount=$repeatcnt|HIPType=$matchtype|sequence=$seqno|ActionFlags=$actionflags|DeviceGroupHierarchyL1=$dg_hier_level_1|DeviceGroupHierarchyL2=$dg_hier_level_2|DeviceGroupHierarchyL3=$dg_hier_level_3|DeviceGroupHierarchyL4=$dg_hier_level_4|vSrcName=$vsys_name|DeviceName=$device_name
Product version: PAN-OS 8.0 - 9.1
Log Event Extended Format :
LEEF:2.0|Palo Alto Networks|PAN-OS Syslog Integration|$sender_sw_version|$matchname|x7C|ReceiveTime=$receive_time|SerialNumber=$serial|cat=$type|Subtype=$subtype|devTime=$cef-formatted-receive_time|usrName=$srcuser|VirtualSystem=$vsys|identHostName=$machinename|OS=$os|identsrc=$src|HIP=$matchname|RepeatCount=$repeatcnt|HIPType=$matchtype|sequence=$seqno|ActionFlags=$actionflags|DeviceGroupHierarchyL1=$dg_hier_level_1|DeviceGroupHierarchyL2=$dg_hier_level_2|DeviceGroupHierarchyL3=$dg_hier_level_3|DeviceGroupHierarchyL4=$dg_hier_level_4|vSrcName=$vsys_name|DeviceName=$device_name|VirtualSystemID=$vsys_id|srcipv6=$srcipv6|startTime=$cef-formatted-time_generated
- If you are using PAN-OS 8.0 - 9.1, copy the following text and paste it in the Custom Format column for the URL Filtering log type.
LEEF:2.0|Palo Alto Networks|PAN-OS Syslog Integration|$sender_sw_version|$threatid|x7C|ReceiveTime=$receive_time|SerialNumber=$serial|cat=$type|Subtype=$subtype|devTime=$cef-formatted-receive_time|src=$src|dst=$dst|srcPostNAT=$natsrc|dstPostNAT=$natdst|RuleName=$rule|usrName=$srcuser|SourceUser=$srcuser|DestinationUser=$dstuser|Application=$app|VirtualSystem=$vsys|SourceZone=$from|DestinationZone=$to|IngressInterface=$inbound_if|EgressInterface=$outbound_if|LogForwardingProfile=$logset|SessionID=$sessionid|RepeatCount=$repeatcnt|srcPort=$sport|dstPort=$dport|srcPostNATPort=$natsport|dstPostNATPort=$natdport|Flags=$flags|proto=$proto|action=$action|Miscellaneous=$misc|ThreatID=$threatid|URLCategory=$category|sev=$number-of-severity|Severity=$severity|Direction=$direction|sequence=$seqno|ActionFlags=$actionflags|SourceLocation=$srcloc|DestinationLocation=$dstloc|ContentType=$contenttype|PCAP_ID=$pcap_id|FileDigest=$filedigest|Cloud=$cloud|URLIndex=$url_idx|RequestMethod=$http_method|UserAgent=$user_agent|identSrc=$xff|Referer=$referer|Subject=$subject|DeviceGroupHierarchyL1=$dg_hier_level_1|DeviceGroupHierarchyL2=$dg_hier_level_2|DeviceGroupHierarchyL3=$dg_hier_level_3|DeviceGroupHierarchyL4=$dg_hier_level_4|vSrcName=$vsys_name|DeviceName=$device_name|SrcUUID=$src_uuid|DstUUID=$dst_uuid|TunnelID=$tunnelid|MonitorTag=$monitortag|ParentSessionID=$parent_session_id|ParentStartTime=$parent_start_time|TunnelType=$tunnel|ThreatCategory=$thr_category|ContentVer=$contentver
- If you are using PAN-OS 8.0 - 9.1, copy the following text and paste it in the Custom Format column for the Data log type.
LEEF:2.0|Palo Alto Networks|PAN-OS Syslog Integration|$sender_sw_version|$threatid|x7C|ReceiveTime=$receive_time|SerialNumber=$serial|cat=$type|Subtype=$subtype|devTime=$cef-formatted-receive_time|src=$src|dst=$dst|srcPostNAT=$natsrc|dstPostNAT=$natdst|RuleName=$rule|usrName=$srcuser|SourceUser=$srcuser|DestinationUser=$dstuser|Application=$app|VirtualSystem=$vsys|SourceZone=$from|DestinationZone=$to|IngressInterface=$inbound_if|EgressInterface=$outbound_if|LogForwardingProfile=$logset|SessionID=$sessionid|RepeatCount=$repeatcnt|srcPort=$sport|dstPort=$dport|srcPostNATPort=$natsport|dstPostNATPort=$natdport|Flags=$flags|proto=$proto|action=$action|Miscellaneous=$misc|ThreatID=$threatid|URLCategory=$category|sev=$number-of-severity|Severity=$severity|Direction=$direction|sequence=$seqno|ActionFlags=$actionflags|SourceLocation=$srcloc|DestinationLocation=$dstloc|ContentType=$contenttype|PCAP_ID=$pcap_id|FileDigest=$filedigest|Cloud=$cloud|URLIndex=$url_idx|RequestMethod=$http_method|Subject=$subject|DeviceGroupHierarchyL1=$dg_hier_level_1|DeviceGroupHierarchyL2=$dg_hier_level_2|DeviceGroupHierarchyL3=$dg_hier_level_3|DeviceGroupHierarchyL4=$dg_hier_level_4|vSrcName=$vsys_name|DeviceName=$device_name|SrcUUID=$src_uuid|DstUUID=$dst_uuid|TunnelID=$tunnelid|MonitorTag=$monitortag|ParentSessionID=$parent_session_id|ParentStartTime=$parent_start_time|TunnelType=$tunnel|ThreatCategory=$thr_category|ContentVer=$contentver
- If you are using PAN-OS 8.0 - 9.1, copy the following text and paste it in the Custom Format column for the Wildfire log type.
LEEF:2.0|Palo Alto Networks|PAN-OS Syslog Integration|$sender_sw_version|$threatid|x7C|ReceiveTime=$receive_time|SerialNumber=$serial|cat=$type|Subtype=$subtype|devTime=$cef-formatted-receive_time|src=$src|dst=$dst|srcPostNAT=$natsrc|dstPostNAT=$natdst|RuleName=$rule|usrName=$srcuser|SourceUser=$srcuser|DestinationUser=$dstuser|Application=$app|VirtualSystem=$vsys|SourceZone=$from|DestinationZone=$to|IngressInterface=$inbound_if|EgressInterface=$outbound_if|LogForwardingProfile=$logset|SessionID=$sessionid|RepeatCount=$repeatcnt|srcPort=$sport|dstPort=$dport|srcPostNATPort=$natsport|dstPostNATPort=$natdport|Flags=$flags|proto=$proto|action=$action|Miscellaneous=$misc|ThreatID=$threatid|URLCategory=$category|sev=$number-of-severity|Severity=$severity|Direction=$direction|sequence=$seqno|ActionFlags=$actionflags|SourceLocation=$srcloc|DestinationLocation=$dstloc|ContentType=$contenttype|PCAP_ID=$pcap_id|FileDigest=$filedigest|Cloud=$cloud|URLIndex=$url_idx|RequestMethod=$http_method|FileType=$filetype|Sender=$sender|Subject=$subject|Recipient=$recipient|ReportID=$reportid|DeviceGroupHierarchyL1=$dg_hier_level_1|DeviceGroupHierarchyL2=$dg_hier_level_2|DeviceGroupHierarchyL3=$dg_hier_level_3|DeviceGroupHierarchyL4=$dg_hier_level_4|vSrcName=$vsys_name|DeviceName=$device_name|SrcUUID=$src_uuid|DstUUID=$dst_uuid|TunnelID=$tunnelid|MonitorTag=$monitortag|ParentSessionID=$parent_session_id|ParentStartTime=$parent_start_time|TunnelType=$tunnel|ThreatCategory=$thr_category|ContentVer=$contentver
- If you are using PAN-OS 8.0 - 9.1, copy the following text and paste it in the Custom Format column for the Authentication log type.
LEEF:2.0|Palo Alto Networks|PAN-OS Syslog Integration|$sender_sw_version|$event|x7C|ReceiveTime=$receive_time|SerialNumber=$serial|cat=$type|Subtype=$subtype|devTime=$cef-formatted-receive_time|ServerProfile=$serverprofile|LogForwardingProfile=$logset|VirtualSystem=$vsys|AuthPolicy=$authpolicy|ClientType=$clienttype|NormalizeUser=$normalize_user|ObjectName=$object|FactorNumber=$factorno|AuthenticationID=$authid|src=$ip|RepeatCount=$repeatcnt|usrName=$user|Vendor=$vendor|msg=$event|sequence=$seqno|DeviceGroupHierarchyL1=$dg_hier_level_1|DeviceGroupHierarchyL2=$dg_hier_level_2|DeviceGroupHierarchyL3=$dg_hier_level_3|DeviceGroupHierarchyL4=$dg_hier_level_4|vSrcName=$vsys_name|DeviceName=$device_name|AdditionalAuthInfo=$desc|ActionFlags=$actionflags
- If you are using PAN-OS 8.0 - 9.1, copy the following text and paste it in the Custom Format column for the User-ID log type.
LEEF:2.0|Palo Alto Networks|PAN-OS Syslog Integration|$sender_sw_version|$subtype|x7C|ReceiveTime=$receive_time|SerialNumber=$serial|cat=$type|Subtype=$subtype|devTime=$cef-formatted-receive_time|FactorType=$factortype|VirtualSystem=$vsys|DataSourceName=$datasourcename|DataSource=$datasource|DataSourceType=$datasourcetype|FactorNumber=$factorno|VirtualSystemID=$vsys_id|TimeoutThreshold=$timeout|src=$ip|srcPort=$beginport|dstPort=$endport|RepeatCount=$repeatcnt|usrName=$user|sequence=$seqno|EventID=$eventid|FactorCompletionTime=$factorcompletiontime|DeviceGroupHierarchyL1=$dg_hier_level_1|DeviceGroupHierarchyL2=$dg_hier_level_2|DeviceGroupHierarchyL3=$dg_hier_level_3|DeviceGroupHierarchyL4=$dg_hier_level_4|vSrcName=$vsys_name|DeviceName=$device_name|ActionFlags=$actionflags
- If you are using PAN-OS 8.0 - 9.1, copy the following text and paste it in the Custom Format column for the Tunnel Inspection log type.
LEEF:2.0|Palo Alto Networks|PAN-OS Syslog Integration|$sender_sw_version|$action|x7C|ReceiveTime=$receive_time|SerialNumber=$serial|cat=$type|Subtype=$subtype|devTime=$cef-formatted-receive_time|src=$src|dst=$dst|srcPostNAT=$natsrc|dstPostNAT=$natdst|RuleName=$rule|usrName=$srcuser|SourceUser=$srcuser|DestinationUser=$dstuser|Application=$app|VirtualSystem=$vsys|SourceZone=$from|DestinationZone=$to|IngressInterface=$inbound_if|EgressInterface=$outbound_if|LogForwardingProfile=$logset|SessionID=$sessionid|RepeatCount=$repeatcnt|srcPort=$sport|dstPort=$dport|srcPostNATPort=$natsport|dstPostNATPort=$natdport|Flags=$flags|proto=$proto|action=$action|sequence=$seqno|ActionFlags=$actionflags|DeviceGroupHierarchyL1=$dg_hier_level_1|DeviceGroupHierarchyL2=$dg_hier_level_2|DeviceGroupHierarchyL3=$dg_hier_level_3|DeviceGroupHierarchyL4=$dg_hier_level_4|vSrcName=$vsys_name|DeviceName=$device_name|TunnelID=$tunnelid|MonitorTag=$monitortag|ParentSessionID=$parent_session_id|ParentStartTime=$parent_start_time|TunnelType=$tunnel|totalBytes=$bytes|dstBytes=$bytes_received|srcBytes=$bytes_sent|totalPackets=$packets|dstPackets=$pkts_received|srcPackets=$pkts_sent|MaximumEncapsulation=$max_encap|UnknownProtocol=$unknown_proto|StrictChecking=$strict_check|TunnelFragment=$tunnel_fragment|SessionsCreated=$sessions_created|SessionsClosed=$sessions_closed|SessionEndReason=$session_end_reason|ActionSource=$action_source|startTime=$start|ElapsedTime=$elapsed
- If you are using PAN-OS 8.0 - 9.1, copy the following text and paste it in the Custom Format column for the Correlation log type.
LEEF:2.0|Palo Alto Networks|PAN-OS Syslog Integration|8.0|$category|ReceiveTime=$receive_time|x7C|SerialNumber=$serial|cat=$type|devTime=$cef-formatted-receive_time|startTime=$cef-formatted-time_generated|Severity=$severity|VirtualSystem=$vsys|VirtualSystemID=$vsys_id|src=$src|SourceUser=$srcuser|msg=$evidence|DeviceGroupHierarchyL1=$dg_hier_level_1|DeviceGroupHierarchyL2=$dg_hier_level_2|DeviceGroupHierarchyL3=$dg_hier_level_3|DeviceGroupHierarchyL4=$dg_hier_level_4|vSrcName=$vsys_name|DeviceName=$device_name|ObjectName=$object_name|ObjectID=$object_id
- If you are using PAN-OS 8.1 - 9.1, copy the following text, and paste it in the Custom Format column for the SCTP log type.
LEEF:2.0|Palo Alto Networks|PAN-OS Syslog Integration|$sender_sw_version|$action|x7C|ReceiveTime=$receive_time|SerialNumber=$serial|cat=$type|genTime=$time_generated|src=$src|dst=$dst|VirtualSystem=$vsys|SourceZone=$from|DestinationZone=$to|IngressInterface=$inbound_if|EgressInterface=$outbound_if|SessionID=$sessionid|RepeatCount=$repeatcnt|srcPort=$sport|dstPort=$dport|proto=$proto|action=$action|DeviceGroupHierarchyL1=$dg_hier_level_1|DeviceGroupHierarchyL2=$dg_hier_level_2|DeviceGroupHierarchyL3=$dg_hier_level_3|DeviceGroupHierarchyL4=$dg_hier_level_4|vsysName=$vsys_name|DeviceName=$device_name|sequence=$seqno|AssocID=$assoc_id|PayloadProtoID=$ppid|sev=$num_of_severity|SCTPChunkType=$sctp_chunk_type|SCTPVerTag1=$verif_tag_1|SCTPVerTag2=$verif_tag_2|SCTPCauseCode=$sctp_cause_code|DiamAppID=$diam_app_id|DiamCmdCode=$diam_cmd_code|DiamAVPCode=$diam_avp_code|SCTPStreamID=$stream_id|SCTPAssEndReason=$assoc_end_reason|OpCode=$op_code|CPSSN=$sccp_calling_ssn|CPGlobalTitle=$sccp_calling_gt|SCTPFilter=$sctp_filter|SCTPChunks=$chunks|SrcSCTPChunks=$chunks_sent|DstSCTPChunks=$chunks_received|Packets=$packets|srcPackets=$pkts_sent|dstPackets=$pkts_received
- If you are using PAN-OS 9.x, copy the following text, and paste it in the Custom Format column for the IP-Tag log type.
LEEF:2.0|Palo Alto Networks|PAN-OS Syslog Integration|$sender_sw_version|$event_id|x7C|cat=$type|devTime=$cef-formatted-receive_time|ReceiveTime=$receive_time|SerialNumber=$serial|Subtype=$subtype|GenerateTime=$time_generated|VirtualSystem=$vsys|src=$ip|TagName=$tag_name|EventID=$eventid|RepeatCount=$repeatcnt|TimeoutThreshold=$timeout|DataSourceName=$datasourcename|DataSource=$datasource_type|DataSourceType=$datasource_subtype|sequence=$seqno|ActionFlags=$actionflags|DeviceGroupHierarchyL1=$dg_hier_level_1|DeviceGroupHierarchyL2=$dg_hier_level_2|DeviceGroupHierarchyL3=$dg_hier_level_3|DeviceGroupHierarchyL4=$dg_hier_level_4|vSrcName=$vsys_name|DeviceName=$device_name|VirtualSystemID=$vsys_id
- Click OK.
- To specify the severity of events that are contained in the Syslog messages, click Log Settings.
- For each severity that you want to include in the Syslog message, click the Severity name and select the Syslog destination from the Syslog menu.
- Click OK.
- Click Commit.
TLS Connector
TLS Connector can receive logs from various devices and log sources via TCP connection with SSL on any custom port
Pre-requisites
- Certificate and key files OR default certificate and key
Certificate and Key Generation
The certificate and key are generated in pairs by the following command using openssl:
openssl req -newkey rsa:2048 -nodes -keyout DNIF_TLS.key -x509 -days 365 -out DNIF_TLS.crt
This certificate with -days parameter as 365 is valid for 365 days from date of generation.
The command on execution prompts for organisational information:
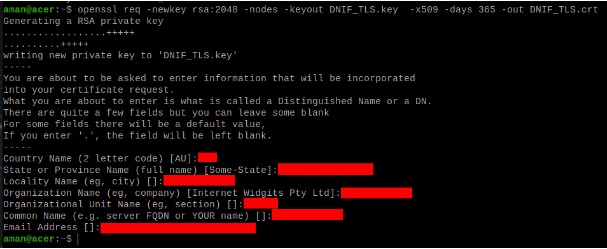
These are self signed certificate-key pair which are stored at the location “/dnif/connectors/tls_connector/”.
Ship certificates from other location
If there is a requirement of individual cert-key pair for every TLS Connector process or if you have your own cert-key pair (say org-x.crt and org-x.key ), then:
- The files need to be moved to Host at the location
“/DNIF/AD/connectors/tls_connector/org-x.crt” and “/DNIF/AD/connectors/tls_connector/org-x.key” - As the mount point of Host “/DNIF/AD/” is “/dnif/” inside the container, therefore the configuration of TLS Connector should have :
- Certificate Path as “/dnif/connectors/tls_connector/org-x.crt”
- Key Path as “/dnif/connectors/tls_connector/org-x.key”
Configuration
TLS Connector operates in two modes. The following settings need to be applied while spawning the TLS connector:
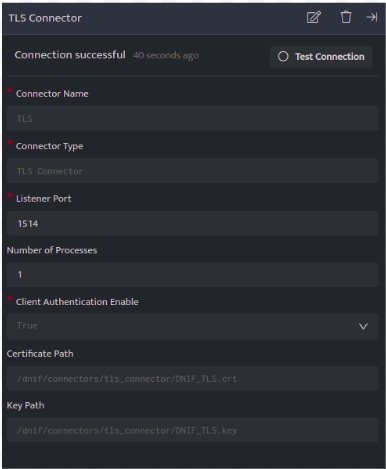
Mode 1: Client Authentication Enable set to True
Configuring the TLS connector in this mode requires the client to authenticate the server(TLS Listener) using the Certificate (.crt) file to start communication.
Configuration details:
|
Configuration |
Description |
Value |
|
Connector Name |
Name assigned to connector shall be visible on console in Connector’s list. The name should therefore be unique to easier identification. |
TLS |
|
Connector Type |
This is populated by default based on the connector that is added via the ‘+’ icon when adding a connector. It must be a valid connector type. |
TLS Connector |
|
Listener Port |
The port on which the TLS Listener shall listen for incoming data. The log sending on the client side should be configured to send data to this port. Multiple TLS Connectors can be spawned on different ports. |
1514 |
|
Number of Processes |
The number of processes spawned for the connector. |
1 |
|
Client Authentication Enable |
This must be set to True to operate TLS Connector to work in this mode. The client (TLS sender) should connect using the certificate(.crt) file to communicate with the server.(Default Value is True) |
True |
|
Certificate Path |
The path to the certificate(.crt) file is to be entered here. DNIF TLS Connector is shipped with a default crt file [ DNIF_TLS.crt ]. |
The default path to this file is /dnif/connectors/tls_connector/DNIF_TLS.crt |
|
Key Path |
The path to the key(.key) file is to be entered here. DNIF TLS Connector is shipped with a default key file [ DNIF_TLS.key ]. |
The default path to this file is /dnif/connectors/tls_connector/DNIF_TLS.key |
Mode 2: Client Authentication Enable set to False
Configuring TLS connector in this mode can allow the client to communicate with server(TLS Listener) without using the Certificate (.crt) file.
Configuration details:
|
Configuration |
Description |
Value |
|
Connector Name |
Name assigned to connector shall be visible on console in Connector’s list. The name should therefore be unique to easier identification. |
TLS |
|
Connector Type |
This is populated by default based on the connector that is added via the ‘+’ icon when adding a connector. It must be a valid connector type. |
TLS Connector |
|
Listener Port |
The port on which the TLS Listener shall listen for incoming data. The log sending on the client side should be configured to send data to this port. Multiple TLS Connectors can be spawned on different ports. |
1514 |
|
Number of Processes |
The number of processes spawned for the connector. |
1 |
|
Client Authentication Enable |
This must be set to False to operate TLS Connector to work in this mode. The client (TLS sender) does not require the certificate(.crt) file to communicate with the server. |
False |
|
Certificate Path |
The path to the certificate(.crt) file is to be entered here. DNIF TLS Connector is shipped with a default crt file [ DNIF_TLS.crt ]. |
The default path to this file is /dnif/connectors/tls_connector/DNIF_TLS.crt |
|
Key Path |
The path to the key(.key) file is to be entered here. DNIF TLS Connector is shipped with a default key file [ DNIF_TLS.key ]. |
The default path to this file is /dnif/connectors/tls_connector/DNIF_TLS.key |
- Click Save after entering all the required details and click Test Connection, to test the configuration.
- A Connection successful message will be displayed on screen along with the time stamp.
- If the connection is not successful an error message will be displayed. Refer Troubleshooting Connector Validations for more details on the error message.
Once the connector is configured, validate if the connector is listed under Collection Status screen with status as Active. This signifies the connector is configured successfully and data is ready to ingest.
Validate Logs
From the collection status page, check the stream in which the logs of the particular device are allocated.
Now go to the search block and check the log details for the specific stream in this case Firewall.